c. Work with the AWS CLI
Your AWS Cloud9 Environment should be ready. In this section, you will:
- Become familiar with AWS Cloud9 Environment.
- Upgrade to AWS Command Line Interface (AWS CLI) Version 2 in order to upload your container images to Amazon Elastic Container Registry (ECR).
- Expand the root volume to at least 20GiB in capacity to allow container images to be built locally.
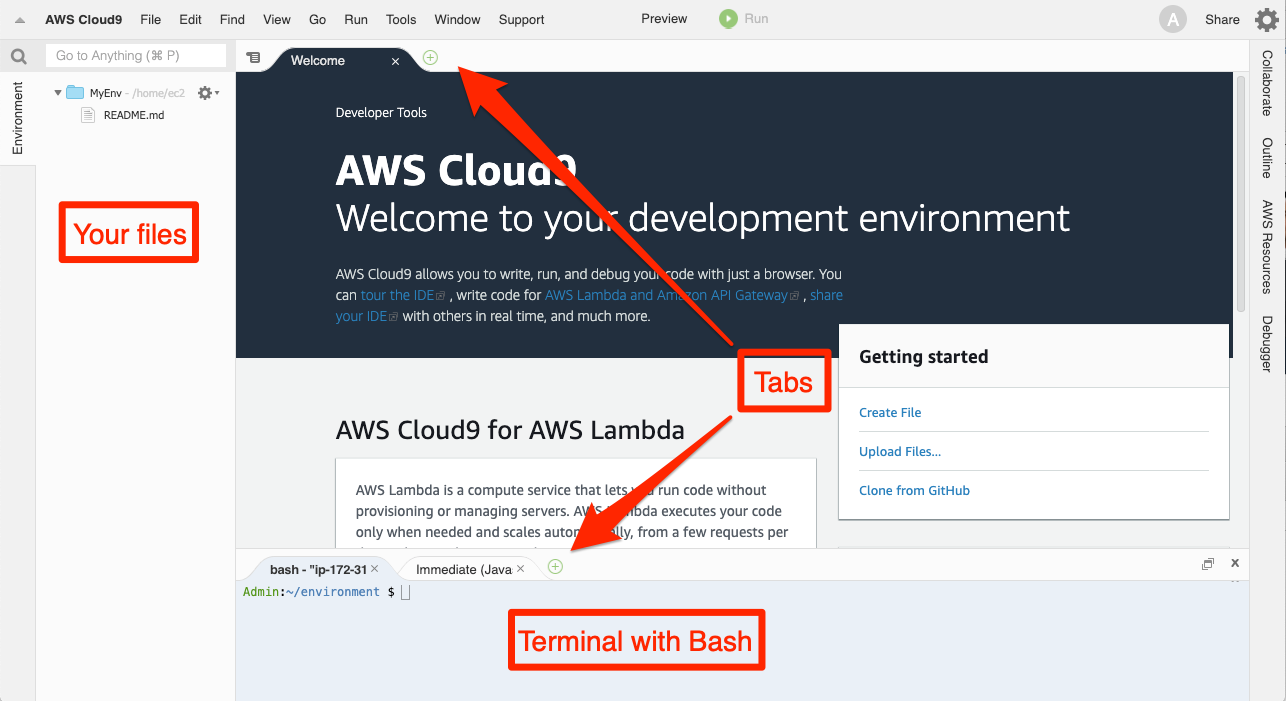
AWS Cloud9 IDE Layout
The AWS Cloud9 IDE is similar to a traditional IDE you can find on virtually any system. It comprises the following components:
- file browser, listing the files located on your instances.
- opened files in tab format, located at the top
- terminal tabs, located at the bottom.
AWS Cloud9 also includes the latest version of AWS CLI, but it is always a good practice to verify you are using the latest version. You can verify the AWS CLI version by following the next section.

Upgrade to AWS CLI Version 2
AWS CLI Version 2 is required to interact with Amazon ECR. You will install it by copying, pasting, and executing the following instructions in the terminal window at the bottom of your Cloud9 IDE window.
- Execute the following commands to upgrade to AWS CLI to Version 2. More information on this process is available at https://docs.aws.amazon.com/cli/latest/userguide/install-cliv2-linux.html.
curl "https://awscli.amazonaws.com/awscli-exe-linux-x86_64.zip" -o "awscliv2.zip" unzip awscliv2.zip sudo ./aws/install -i /usr/local/aws-cli -b /usr/bin aws --version - After executing ther commands above, confirm that you now have AWS CLI version 2 sucessfully installed by verfying output from the last command above results in output similar to the following:
aws-cli/2.5.7 Python/3.9.11 Linux/4.14.273-207.502.amzn2.x86_64 exe/x86_64.amzn.2 prompt/off
Install JQ
To help with commands results slicing and filtering.
sudo yum -y install jq
Configure AWS Region
- Remove any existing credentials file by copying, pasting and executing the following commands in a terminal on your Cloud9 instance.
rm -vf ${HOME}/.aws/credentials - Configure the AWS CLI to use the current AWS region:
export AWS_REGION=$(curl --silent http://169.254.169.254/latest/meta-data/placement/region)
aws configure set default.region ${AWS_REGION}
aws configure get default.region
Resize AWS Cloud9 root Volume
To build Docker images on AWS Cloud9, you will need to resize the root volume of your AWS Cloud9 instance to at least 20GiB.
You can use the following command on the AWS Cloud9 terminal to resize the root volume:
curl -s https://gist.githubusercontent.com/wongcyrus/a4e726b961260395efa7811cab0b4516/raw/6a045f51acb2338bb2149024a28621db2abfcaab/resize.sh | bash /dev/stdin 20